We're not talking about an edible cake here! A diaper cake is simply a cake-shaped arrangement of diapers. This might sound a little odd at first, but it can be a very appreciated gift at a baby shower. Diapers are expensive! Giving just a plain old box of diapers is boring; arranging them in this fun way is not.
Diaper cakes are not only fantastic baby shower decorations, but they also make great baby shower gifts. The internet is littered with sites offering to sell you a pre-made diaper cake, but at those prices plus shipping who can afford it?
Just like any gift, when it comes from your heart and hands it is that much more special. In this case it is more cost-effective too. Don’t worry, cost-effective isn’t code for cheap and second rate. You can make a diaper cake just as cute as anything you’ve seen and it really isn’t difficult.
The Plan to Make a Diaper Cake
The first step is to decide what kind of cake you’d like to make. Do you want a simple short cake, or an ultra layer cake? No matter your fancy the first place to start is with a photo. Just pick a photo, follow these simple tips, and your cake will be a hit!
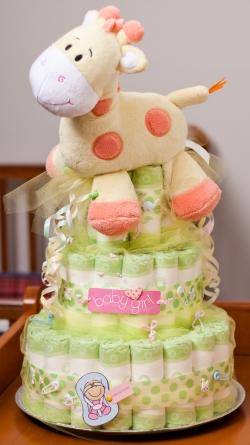
The instructions here outline how to make a three tier diaper cake. This impressive and beautiful option isn't as hard to build as it may seem. Anyone with the ability to snap fingers, tie a bow, and open a diaper box can do it.
Diaper Cake Supplies
The basic supplies are: diapers, card board, large and small rubber bands, and tape. Additional supplies to decorate the cake and send the cute quotient through the roof include: ribbons and bows in baby blue or pink, pacifiers, bottles, small stuffed toys, or any other small baby supply item that is cute.
Make sure you set some sort of budget for yourself before you begin shopping. While it can be tempting to go all-out and turn your diaper cake into something truly extraordinary, you don't want to burn a massive hole in your wallet by doing so. If the baby shower you'll be attending has a price limit for gifts, make sure you honor that. Otherwise, stick to what is reasonable for yourself.
Aim to get the highest-quality diapers that you can afford. After all, the diapers are the main part of this gift, so you don't want to cheap out on them. Consider what brand you used for your own child. If you haven't had a child yet, do some research and see what brand is the best fit.
Finally, order your supplies ahead of time so you can make adjustments as needed. If you get your supplies and assemble your diaper cake too close to the day of the baby shower, you won't have time to make any additional purchases. You may realize that you ordered too few diapers by the end, or that you don't have enough ribbon to decorate the full diaper cake. Issues like these can quickly be solved with enough time on hand.
Getting Started
The first thing you’ll need to decide when making the diaper cake is how large it is going to be and what size diapers you will be using. A three tier cake is cute and can use a different size diaper for each level, but you could also use the same size for all of it. If you are using different sized diapers for each layer, you will need to purchase a large bag of each size. If you are using all the same sized diaper, then you’ll need three large bags or one super sized box (200+ count).
Step one: Roll all the diapers like a burrito as tightly as you can. Use tape or rubber bands to keep them rolled.
Step two: If you purchased the box of diapers you can use it, if not get another cardboard source. Cut three circles: the largest should be 18-20 inches in diameter, cut another circle 3 inches smaller, and a third circle three inches smaller than that.
Step three: Arrange the rolled diapers on the largest cardboard circle starting at the center and working your way outward. To maintain stability, use rubber bands at intervals. Once the edge of the cardboard circle is reached tie the diapers together with a ribbon. This not only holds the cake together, but the ribbon is a pretty touch. Repeat this process with the other two layers.
Step four: Stack the layers one on top of the other and decorate the diaper cake with the extras you have gathered. It is an especially nice touch to add a cake topper of some kind: a doll, stuffed bear, or a framed photo from the ultrasound.
Step five: Give your confection to the happy mother-to-be and enjoy the look on her face.