Rye bread is a staple in many American households. You've likely heard the argument that rye bread is healthier than white bread. We won't get into the details here, but you certainly won't be doing a disservice to your family by serving them rye bread!
Making your own rye bread has its advantages. In the long run, it's cheaper than buying rye bread from the store. While it does take more time, the benefits are absolutely worth it. Plus, homemade rye bread doesn't include any unwanted additives.
It is important, however, to keep in mind one downside of homemade rye bread. It won't last as long as store-bought rye bread, due to its lack of preservatives. You can increase the shelf life of your homemade rye bread by storing it in the refrigerator. Make sure to inspect it closely for signs of mold or other issues before consuming.
If you enjoy this farmhouse rye bread recipe, consider giving our other bread recipes a shot! We have plenty for you to choose from, helping you move away from store-bought bread towards more cost-effective baking at home. Make sure you bookmark each recipe and enjoy!
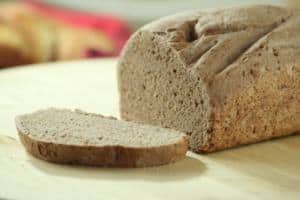
Farmhouse Rye Bread
Ingredients:
For Dough:
1 cup scalded milk
2 Tablespoons sugar
1 ¼ teaspoon salt
2 Tablespoons butter, softened to room temperature
3 ¾ cups all purpose flour
1 ¾ cups rye flour
¼ cup cocoa
For Yeast Sponge:
2 (¼ oz.) packages dry yeast
½ cup water warmed to 115°F
1 teaspoon sugar
Makes 2 loaves
Directions:
1. To make the dough: In a medium heavy-bottomed pan, heat milk, sugar, and salt over medium heat until small bubbles form around edges. Remove from heat, add butter, and stir until melted. Let cool to room temperature.
2. To make the sponge: dissolve yeast in warm water. Add sugar. Let stand uncovered in a warm place for about 10 minutes to proof.
3. Sift all purpose flour, rye flour, and cocoa into a medium bowl.
4. Mix proofed yeast and cooled milk mixture in the bowl of a standing mixer fitted with the paddle attachment. Beat in dry ingredients, 1 cup at a time, until well mixed. Change to dough hook and knead for 3 to 4 minutes, or until dough comes together and is smooth and shiny.
5. Coat a medium bowl with vegetable spray or butter. Place dough in greased bowl. Coat a piece of plastic wrap with vegetable spray (to prevent sticking) and place it loosely over dough. Allow dough to rise until double in size, about 1 hour. Punch down dough and divide in half.
6. Coat two 9 inch by 5 inch by 3 inch baking pans with vegetable spray. Shape dough into two loaves on a lightly floured work surface. Place loaves in prepared pans and let rise until double in size, about 1 hour.
7. Place the oven rack in the middle position. Preheat the oven to 375 degrees F.
8. Bake breads until crusty, about 40 minutes. Turn bread out of pans onto rack and cool to room temperature.