
In order to do almost anything on an iPhone or MacBook, you have to have an Apple ID. Essentially, this is your private login so you can store your data safely while also accessing your popular apps, like iCloud, the App Store, and iTunes, among others. If you allow your child to use your computer or smartphone, then you need to ensure that they can’t download unauthorized content or view inappropriate media online. So, you can create an Apple ID for your child by setting them up through the Family Sharing tool on your device. Today, we will talk about how to get your child set up and why they may need an ID.
Key Points
- As a parent, you will have full control of how your child uses their Apple products when you make their Apple ID through Apple's Family Sharing.
- You can create an Apple ID for your child on a Mac or iPhone.
- Your child can safely enjoy the fun activities available on a computer or smartphone without risk of them viewing inappropriate content or engaging with people they shouldn't be.
Why Would You Create an Apple ID for Your Child?
It is no secret that in today’s world, we are addicted to our phones and computers. We use them for important work, like paying the bills and hosting meetings at work. However, we also use them for leisure.
We take pictures with our phones, we create to-do lists, and we update our calendars. If you want your kids to be in the loop, then you can create an Apple ID for your child, and they can also see and share their family photos and see what is coming up in the family calendar. You can also share your music, books, games, and more.
- 4-serving meals starting at $3.77 per serving (up to 25% cheaper than HelloFresh).
- Incredible variety with 10+ weekly meal options, delivered directly to you.
- Easy to prepare meals ready in 30-minutes or less.

As a parent, you have full control of what your children can do when they are on their Apple devices, even if they have their own Apple ID. You can approve and moderate download requests or prohibit them from buying games and software.
You are able to create an Apple ID for your children through Apple’s Family Sharing application. Keep in mind that if your child is under the age of 13, they must get an ID through this system. The Apple company will not let them create their own independent ID until they are past that age.
How to Create an Apple ID for Your Child on a Mac Computer
You can make an apple ID for your child on your computer, tablet, or iPhone. There are several steps that go into this process, but it is relatively straightforward once you get into it.
Below is a step-by-step guide for creating an Apple ID on a computer:
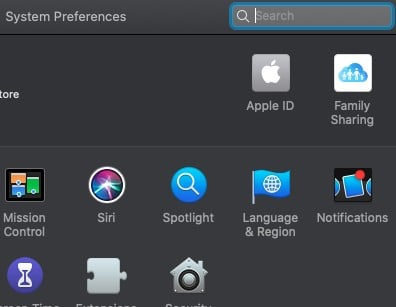
1. Go to the System Preferences section of your computer. Double-click to open it. If you are unable to find it, then search through the Applications folder on your computer, and it will be there.

©
2. Once you are in the settings area, you can find the button to bring you to the Family Sharing section. It may be on the upper right-hand corner of that screen.
©
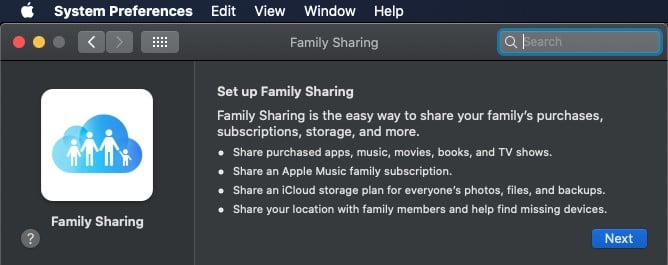
3. Upon clicking on the Family Sharing button, you will be presented with a small screen that will tell you about the program. In addition to the chance to share your apps, music, photos, storage, and backup files, you can also share your location with your family members. Click the NEXT button.
©
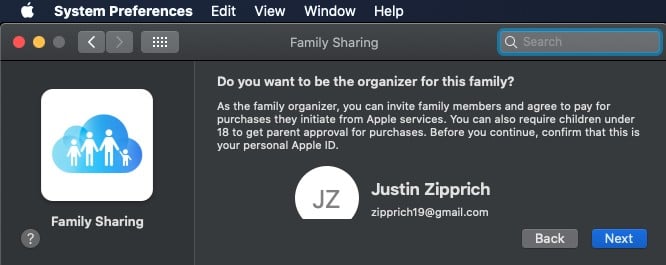
4. The next screen will ask if you are the one who will be the organizer for the family. If you have more than one parent on this computer, then you can choose between users. If you are the user, then click the NEXT button.
©
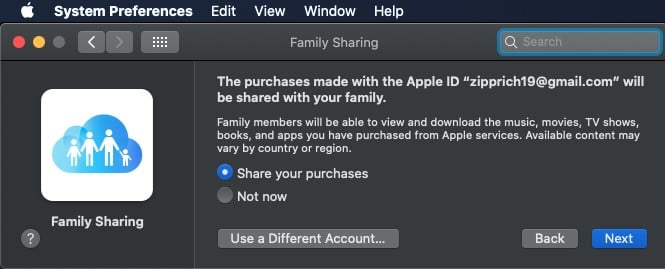
5. The next screen will ask you if you want to share your purchases. That includes your movies, music, TV shows, books, and apps with your child. Make your decision and then click the NEXT button.
©
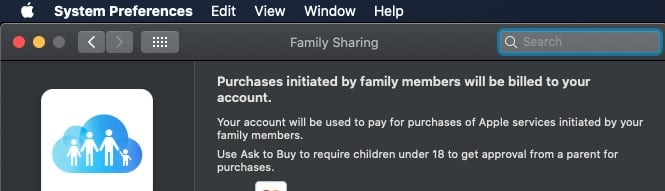
6. Next, you will be presented with a screen that will ask if the purchases that your kid makes should be billed to your account. If you pick the setting, then you can require that your kids get approval from you before making a purchase.
©
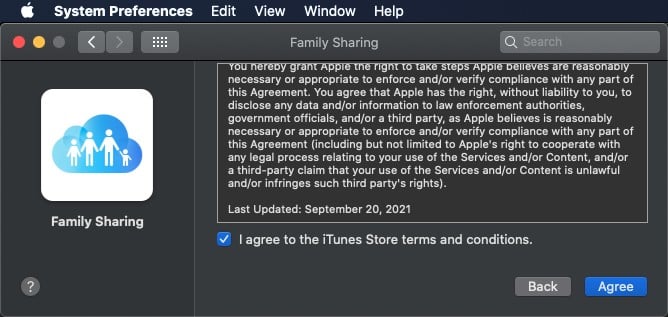
7. The next screen is your basic Terms and Conditions box for the iTunes Store. If you want to know what you are in for, then make sure to read it until the end. If you’re good, then click the Agree button.
©
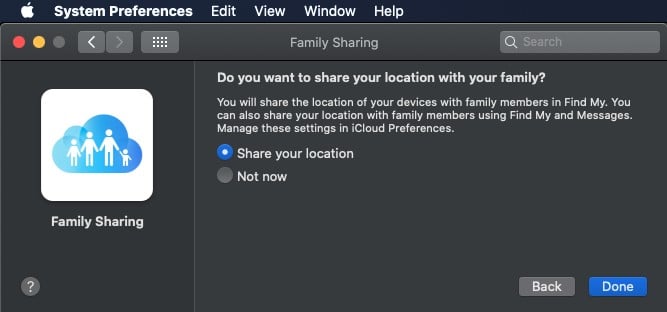
8. Next is the Share Your Location screen. This is where you decide if you want to turn on the setting that will allow you to find your kids or their devices. Keep in mind that you can also modify the setting later on if you change your mind down the line.
©
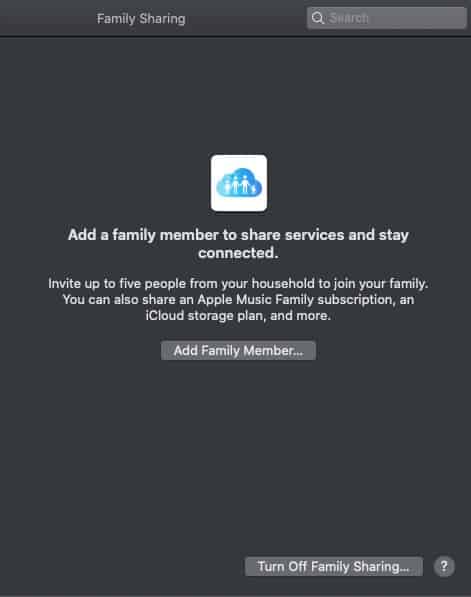
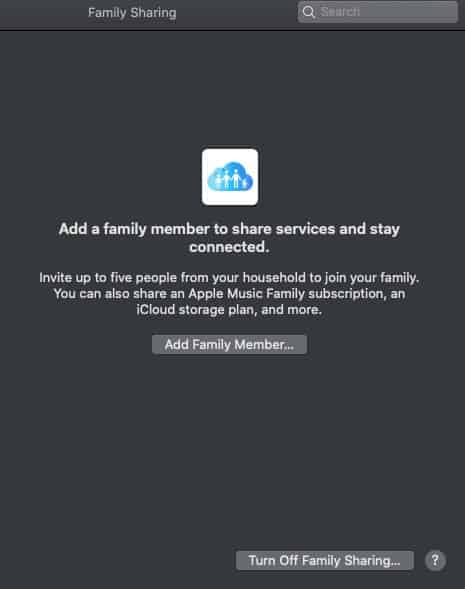
9. Now that you have gone through the preliminary steps and selected your settings, you will reach the screen where you can add a family member.
©
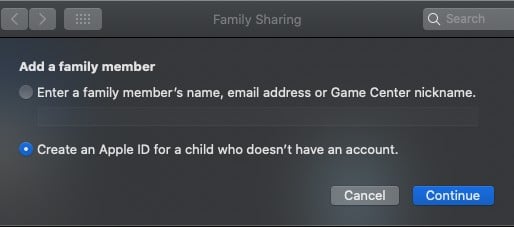
10. On the next screen, you will need to either add an existing family member or create an Apple ID for a child that doesn’t already have one. If your child doesn’t have an ID yet, then choose the bottom option and press continue.
©
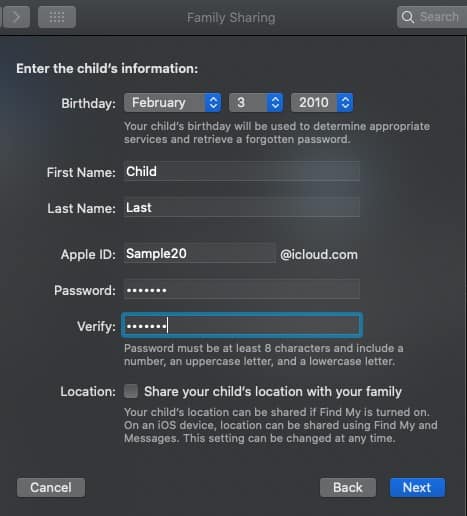
11. On the next screen, you will add your child’s birthday and first and last name. Then, you will need to create an Apple ID for them and a password. Once you have what you need, press continue
©
After you press enter, you will get a final warning that you cannot change the child’s email address after you create it. You will also be unable to change their birthdate after the fact. If you are sure, then continue.
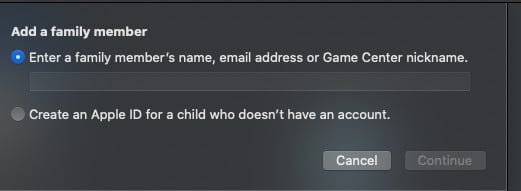
12. With the family member now created, you can add a family member. You will be presented with the same screen as before, and you can click “Add Family Member.”
©
13. Again, you will be presented with the screen you saw previously. This time, choose the best option, add the Apple ID that you created earlier, and you can begin sharing with the kids.
©
How to Create an Apple ID for Your Child on an iPhone
You also have the ability to create an Apple ID on your iPhone. Many of the steps are similar. If you have a phone that has iOS 16 or higher installed, then you can follow the steps below. If you have an older version, then things may look slightly different, but you will still be able to follow along.
Here are the steps for creating an ID for your child on the phone:
1. Go to the Setting screen on your phone.
2. Next, go to the Family section.
3. On the upper right-hand corner of the screen, you can press the blue icon to add a family member.
4. On the next screen, you have the same options as you did on the computer. If your child already has an account, then you can add them. If they do not, then you can Create Child Account.

©
5. Continue to follow the steps, like you did on the computer. You will add the child’s name, and birthdate and create an ID and a password for them.
- 4-serving meals starting at $3.77 per serving (up to 25% cheaper than HelloFresh).
- Incredible variety with 10+ weekly meal options, delivered directly to you.
- Easy to prepare meals ready in 30-minutes or less.
Set Restrictions
You can also modify the “Allowed Content” section. That is where you can block music with explicit content and keep them from watching adult movies and TV shows, and more.
Once you set up your child’s Apple ID, you can set restrictions for how your kid can use their phone, including how long the screen will stay on, if they can use the camera, whether they are allowed to install or delete apps, if they are able to go online, and more.
If you choose to modify these settings, then you can do so by doing the following:
- Go to the Settings screen.
- Click General.
- Click Restrictions.
- Then, Enable restrictions. There, you will see a list of settings that you can turn on or off.
Can My Child Bypass These Restrictions?
Generally speaking, no, your child can't bypass the restrictions you set on their Apple ID unless they gain access to your Apple product. It's important to maintain strong passcodes on all of your Apple devices, to prevent your child from being able to get into them. Change your passcodes periodically, and monitor the settings you have set for your child to ensure they aren't being changed.
While Apple does not permit children under the age of 13 to have their own Apple ID that is independent of Family Sharing, it is always possible for your child to lie about their age. Keep a close eye on them, and monitor their device use. It is important that your child sees their Apple devices as a privilege, not something they are obligated to have.
Conclusion
By following the simple steps above, you can create an Apple ID for a child. By doing so, you can allow them to share photos, apps, games, and more. You can also keep an eye on your child’s activity. It is a great way to give your kids some independence while also keeping them at arm’s length.